Leader Knot
Leader knots make a strong connection between two lines.
How to Tie Leader Knots
While the Uni-Knot is a great knot for bringing two lines together, there are many other knots that might work best depending on your needs.
We will review the most recommended leader knots in this section. Test them out on some spare line when you have a moment.
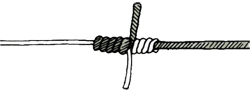
Blood Knot
This knot has been around for a long time and as a result, is used most often by anglers around the world. You can’t go wrong with this knot.
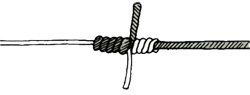
Take the two line ends and tie a simple overhand knot.

Blood Leader Knot 1
Then tighten to combine the two lines into one. Pull one side of the loop down and begin taking turns with it around the standing line. We recommend making five or six turns. Keep point where turns are made open so turns gather equally on each side.
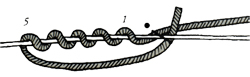
Blood Leader Knot 2
Now make another five or six turns with the other line. After all turns are made, reach through centre opening and pull remaining loop through. Make sure you keep your finger on this loop so it will not spring back.
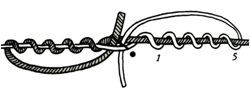
Blood Leader Knot 3
Now hold the loop with your teeth and pull both ends of line, making turns gather on either side of loop. Set the knot by pulling the lines tightly, but moisten them before doing so to get the most strength out of the knot.
Blood Leader Knot 4
Tippet and Leader Knot
A strong join between a monofilament line and a heavier leader.
Use this leader knot for wind–on leaders.
Step 1 Lay your tippet next by the end of your fishing leader. They should be overlapping by about 4 to 6 inches (10 – 18 cm).
Step 2 Then tie an overhand knot in the section where the two pieces are doubled together. In order to do this, hold the lines together as if they were one line and form a loop.
Step 3 Now bring the end of the leader and the entire end of the tippet through the loop at the same time.
- NOTE: Do NOT pull the loop too tight AND make sure you leave it open or you will have to start over again.
Step 4 Double the overhand knot by bringing the same doubled section through the loop you’ve made once again.
Step 5 Now tighten the surgeon’s knot by holding all of the ends and pulling on them firmly and steadily.
Step 6 Trim the tag ends (the loose end of the line, the part used to tie a knot) of the leader and tippet close to the knot, leaving a little room for movement. This will allow the knot to move a little while in use without slipping apart.