How to Tie a Uni-Knot

The Uni-Knot is a basic knot that is required knowledge for any angler. And if done properly, it will provide you with close to the maximum breaking test.
This knot is probably the most common knot that’s used by anglers and some argue that it’s the only knot need.
Tying a Uni-Knot
Take the fishing line through the hook eye and bring it back around parallel to the main line. Now make a loop, which should go out six inches from the eye.
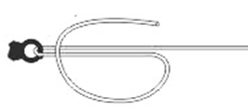
Uni-Knot Step 1
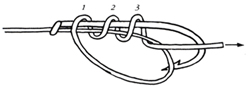
Hold the double line where is goes through the eye. Now make 6 turns around the line like a spiral.
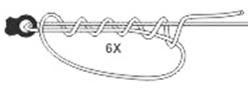
Uni-Knot Step 2
Now pull the end of the line slowly while holding the eye of the hook. However, before pulling the line all the way through, moisten the line so it tightens properly.
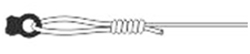
Uni-Knot Step 3
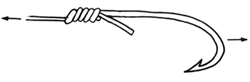
The end result should look like this:

Uni-Knot Step 4
Trim off any excess line and you are good to go.
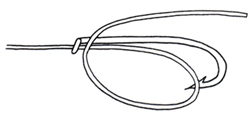
Uni-Knot Loop
Also known as the Duncan Loop or the Hangmans Noose, it is tied the same way as the Basic Uni-Knot, but is tightened using a pair or pliers in the last step. We recommend using the manual way, especially if using a line that is not very strong.
Uni-knot Snell
The Uni-knot snell is also known as the whipped snell. And like all uni-knots it is pretty strong with about 85% to 95% of the lines test strength.
This knot is perfect for attaching a hook directly to the end of the line.
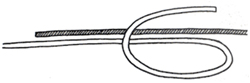
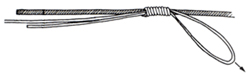
Take the end of the line and thread it through a down-turned hook eye for about eight inches. Now form a uni-circle by holding the line against the shank.
Uni-Knot Snell Step 1
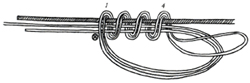
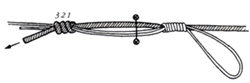
Create a uni-knot around the hook shank with 3 turns.
Uni-Knot Snell Step 2
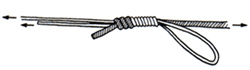
Tighten the uni-snell by pulling both the hook and the line in opposite directions and then trim off the excess.
How to Tie a Uni-Knot Splice
The uni-knot splice is used to splice two lines together. Its strength is between 80% to 95%.
Begin by placing the two lines side by side for about8 inches. Overlap one line over the other using the same loop as a regular uni-knot.
Uni-Knot Splice Step 1
Tie the same basic knot pattern around the two lines, which is common on the uni-knot. Now pull the knot tight slowly.

Uni-Knot Splice Step 2
Repeat the steps above and you should see the following:

Uni-Knot Splice Step 3
Now pull the two knots together by pulling on both lines.

Uni-Knot Splice Step 4
How to Tie a Uni-Knot Leader
This knot is designed for attaching a leader that is no more than 4 times stronger than the line. A properly tied knot will preserve about 95% of the lines test strength. This knot has the same elements of the uni-knot splice.
Start by doubling the ends of both lines back about 8 inches. Now slip the loop through the leader loop. Be sure to allow for tying a uni-knot around both lines as there is more material here than in a regular knot (see figure below). Notice that only 4 turns instead of the normal 6.
Uni-Knot Leader Step 1
Now pull on the loop.
Uni-Knot Leader Step 2
Now we must form a uni-circle with the leader and tie another uni-knot. However, this uni-knot will only have 3 turns.
Uni-Knot Leader Step 3
Just as with the uni-knot splice, pull them together.
Uni-Knot Leader Step 4