Snelling a Fish Hook
A snelled knot takes seconds to tie and is relatively easy for a novice angler. The resulting bond is one of the strongest fishing knots around. Compare this to a standard knot tie, which can weaken the line by as much as 40%. The snell is considered the easiest fish hook tying knot.
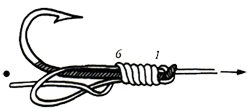
How to Snell a Fish Hook – Standard SnellThis is a common snell used by many anglers, and is very popular with salmon anglers on the west coast. Run the line through the hook’s eye and then down the shank of the hook followed by creating a loop behind the eye, keeping the line against the hook shank as per the image below.  Standard Snell Knot 1 Pass the tag end of the line around the shank and through the loop, creating five loops.  Standard Snell Knot 2 Pull the end of the line tight and trim off the excess.  Standard Snell Knot 3 Quick SnellThe quick snell is ideal for bait fishing with ten-pound test lines or greater. While it can be used in lighter lines, it’s reliability is minimal. Step 1. Pass the line through the hook eye from above. Now rotate the line around the shank six times to form a cinch knot. Step 2. Now hold the hook and pull the line to tighten the snell. We recommend that you moisten the line as you do this. Locked SnellThe locked snell is tied using the end line rather than using a separate length of line or leader. Pass the line through the hook’s eye and then form a loop above the shank so that a three-inch long tag goes down from the direction of the eye.  Locked Snell Knot 1 Hold the hook as indicated by the dot below. Create six turns around both strands of the loop and the hook shank. Now pass the tag end through the loop.  Locked Snell Knot 2 Now pull the end line forward in order to tighten the snell. Be sure to moisten the line snell before tightening.
|